ShopDreamUp AI ArtDreamUp
Deviation Actions

HeartBox Ultimate
❤️ Get access to everything. You get all the benefits of the "CosmicHeart 18+" tier and some more additional exclusive artwork, as well as access to all additional explicit fetish content (Preggo, Futa, Shemales, etc) ❤️
$10/month


Suggested Deviants


Suggested Collections


You Might Like…


Description
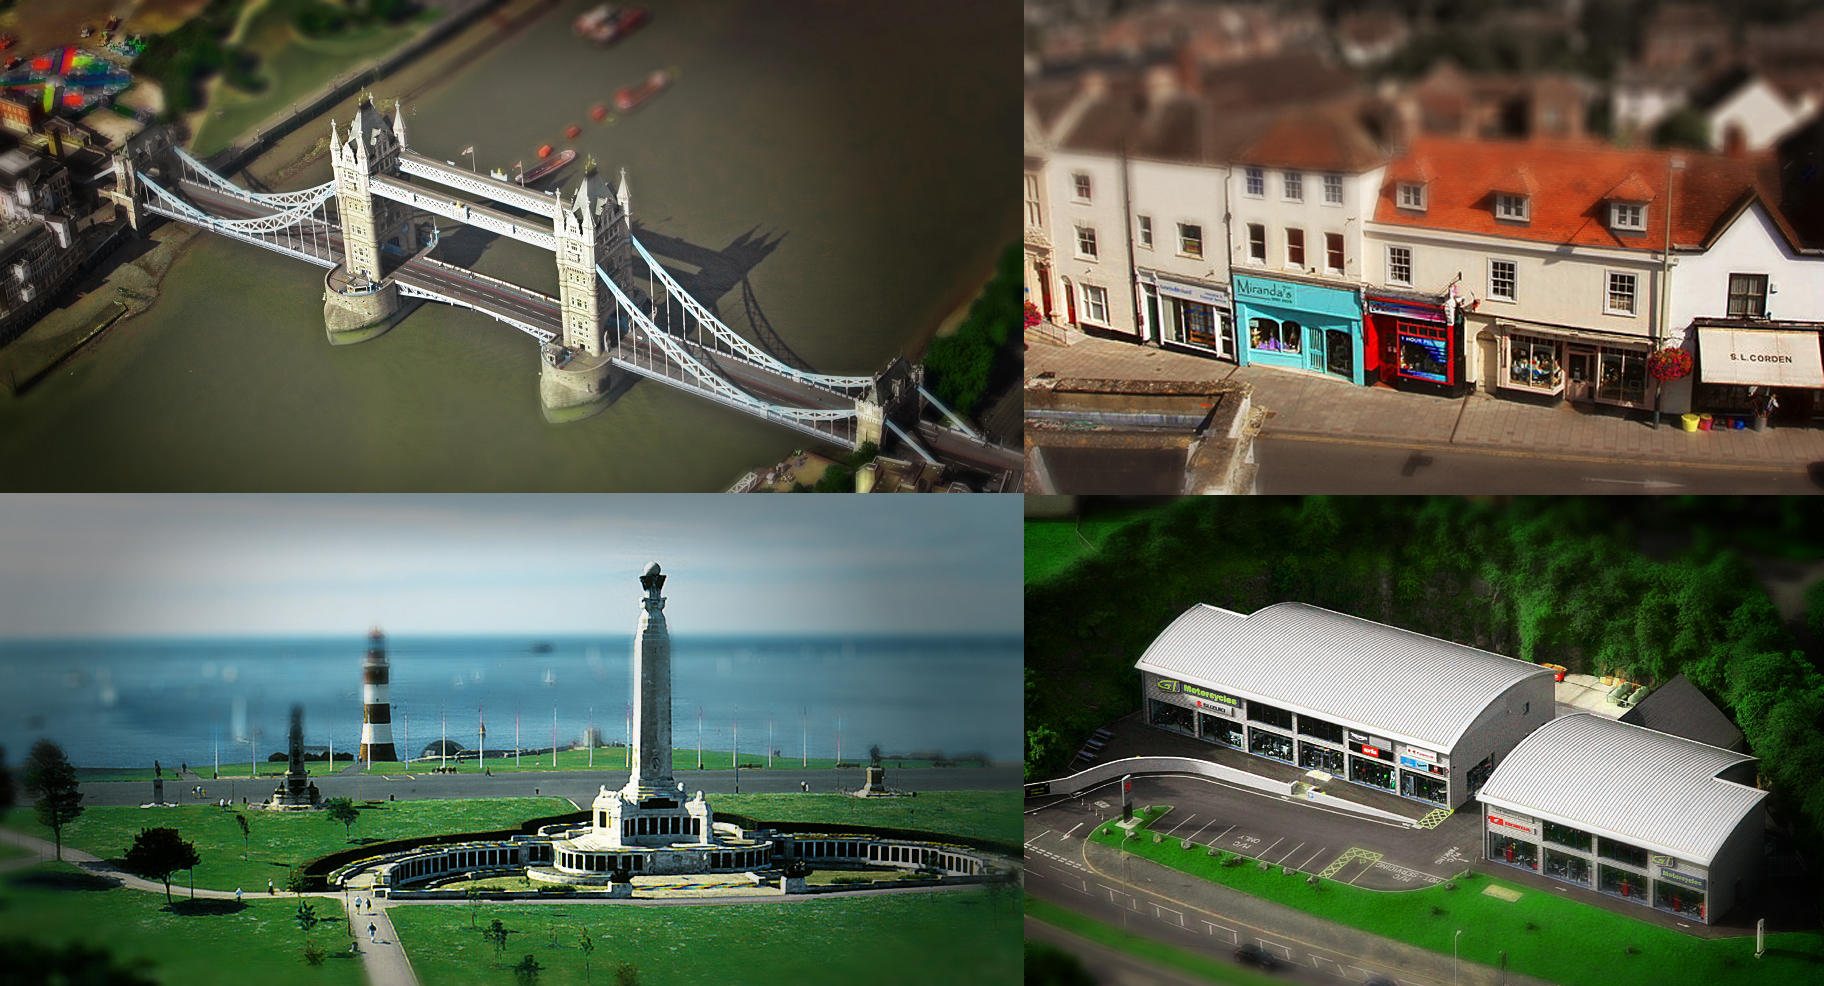
I was inspired by Newton Faulkner's music video "Clouds". None of these photos are mine, but I wanted to test and establish a technique to reproduce the effect  (Smile)") All rights to their respective owners.
All rights to their respective owners.
To produce this effect you need to do the following:
1. Load your photo into Photoshop
2. Duplicate the photo
3. Run an Unsharp filter on it (Filter > Sharpen > Unsharp...)
4. Use the following settings (but please experiment!):
This will result in a very subtle sharpen.
5. Duplicate the sharpened layer
6. Run a Lens Blur filter on it (Filter > Blur > Lens Blur...)
7. Use the following settings (but, again, please experiment!):
8. Create a layer mask on this blurred layer.
9. Either using the gradient tool or a brush, carefully pick out only that which you want in focus. If you have a sea shot, like I do, sometimes you need to brush out the background and restore the foreground. Keep a low flow setting for this.
10. Group all the layers apart from the original photograph.
11. Create a new Hue and Saturation Adjustment Layer on/in the group (Layer > New Adjustment Layer > Hue and Saturation...)
12. This will be at your own discretion, but you will want to focus on boosting the primary colour in your scene (grass, rooftops, shop fronts, buckets, anything with a distinct value).
13. Try these settings as a tester.. it may or may not work for you, but these are the settings for the little village near trees:
For the greens I needed to widen the range at the bottom so it reads: 349°/40° and 153°/179°. This included a broader range of greens and yellows in the trees. Experiment!
14. Add a Black and White Adjustment Layer (Layer > New Adjustment Layer > Black and White...)
15. In some cases this is a cool addition and may be worth keeping as a back up, but what you want to do is to either alt+drag copy your previous mask onto this layer, or create a new one with the gradient tool, where that which is out of focus is less saturated. Play with this!
16. Create a Curves Adjustment Layer (Layer > New Adjustment Layer > Curves...)
17. Again, be creative, but your aim should be to isolate primary Red, Green and Blue values in the scene (hopefully your Hue and Saturation layer will have helped with this first") ) and gently boost their values. Nothing solid here.
) and gently boost their values. Nothing solid here.
18. Create a new layer above everything
19. Fill it with black
20. Create a mask for that layer and use the eliptical gradient tool to knock out lots of black to create a subtle vignette. Experiment with layer and opacity settings.
This should give you a great toy town photograph! In theory you should be able to apply this to an entire video project in AfterEffects, without the need for expensive plugins!
Any questions, please ask
To produce this effect you need to do the following:
1. Load your photo into Photoshop
2. Duplicate the photo
3. Run an Unsharp filter on it (Filter > Sharpen > Unsharp...)
4. Use the following settings (but please experiment!):
- 42
1.7
0
This will result in a very subtle sharpen.
5. Duplicate the sharpened layer
6. Run a Lens Blur filter on it (Filter > Blur > Lens Blur...)
7. Use the following settings (but, again, please experiment!):
- Click "More Accurate"
Depth Map = none
Iris Shape = Octagon
Radius = 100
Blade Curvature = 100
Rotation = 241
Specular Highlights Brightness = 0
Threshold = 0
Noise Amount = 0
Distribution = Uniform
tick "Monochromatic"
8. Create a layer mask on this blurred layer.
9. Either using the gradient tool or a brush, carefully pick out only that which you want in focus. If you have a sea shot, like I do, sometimes you need to brush out the background and restore the foreground. Keep a low flow setting for this.
10. Group all the layers apart from the original photograph.
11. Create a new Hue and Saturation Adjustment Layer on/in the group (Layer > New Adjustment Layer > Hue and Saturation...)
12. This will be at your own discretion, but you will want to focus on boosting the primary colour in your scene (grass, rooftops, shop fronts, buckets, anything with a distinct value).
13. Try these settings as a tester.. it may or may not work for you, but these are the settings for the little village near trees:
- Master = 0,0,0
Reds = 0,+31,0
Cyans = 0,+39, 0
Greens = 0,+70,+69
Cyans2 = 0,+31,0
Blues = +7,+72,-9
Magentas = 0,0,0
For the greens I needed to widen the range at the bottom so it reads: 349°/40° and 153°/179°. This included a broader range of greens and yellows in the trees. Experiment!
14. Add a Black and White Adjustment Layer (Layer > New Adjustment Layer > Black and White...)
15. In some cases this is a cool addition and may be worth keeping as a back up, but what you want to do is to either alt+drag copy your previous mask onto this layer, or create a new one with the gradient tool, where that which is out of focus is less saturated. Play with this!
16. Create a Curves Adjustment Layer (Layer > New Adjustment Layer > Curves...)
17. Again, be creative, but your aim should be to isolate primary Red, Green and Blue values in the scene (hopefully your Hue and Saturation layer will have helped with this first
18. Create a new layer above everything
19. Fill it with black
20. Create a mask for that layer and use the eliptical gradient tool to knock out lots of black to create a subtle vignette. Experiment with layer and opacity settings.
This should give you a great toy town photograph! In theory you should be able to apply this to an entire video project in AfterEffects, without the need for expensive plugins!
Any questions, please ask
Image size
1824x986px 1.37 MB
© 2012 - 2024 Denizen-v1
Comments5
Join the community to add your comment. Already a deviant? Log In
Love the miniatures! Is this set up at your house? xD
My only critique is the photo of the miniature houses: the blur should be more gradual over the rooftops. It looks a little unrealistic to me with it transitioning from a heavy blur to a clear, crisp image.
My only critique is the photo of the miniature houses: the blur should be more gradual over the rooftops. It looks a little unrealistic to me with it transitioning from a heavy blur to a clear, crisp image.